

Chapter 1: Crochet Magic: A Journey for Absolute Beginners
Welcome to the enchanting world of crochet, where creativity knows no bounds, and every stitch is a step on a magical journey! In this book, we embark on an exciting adventure tailored specifically for absolute beginners, guiding you through the wondrous art of crochet. Whether you're picking up a hook for the very first time or you've dabbled a bit but want to refine your skills, you're in the right place.
Crocheting is more than just a craft; it's an art form that allows you to transform ordinary yarn into extraordinary creations. With each knot and every loop, you'll be crafting not just pieces of fabric, but stories, memories, and beautiful heirlooms that last a lifetime.
In the opening chapters, you'll learn the fundamental techniques. We'll start with the basics: how to create the very foundation of your crochet projects, the humble slip knot. From there, we'll dive into the magical world of double crochet, teaching you the art of creating intricate and versatile stitches. Ever wondered about the secret behind the mysterious "magic ring"? Fear not; we will unravel this enchanting technique, allowing you to start your crochet projects seamlessly.
But that's not all. As you progress, you'll discover the charm of the granny square pattern—a classic in the crochet realm. We'll walk you through step-by-step, helping you create beautiful, multicolored squares that are the building blocks of countless crochet wonders.
In these pages, you'll find not just instructions but inspiration. Each stitch is an opportunity to weave your own story, to express your unique style, and to gift the world with handmade treasures. So, pick up your hook, feel the softness of the yarn between your fingers, and let the journey begin.
Get ready to be inspired, to create, and to experience the sheer joy of seeing your imagination come to life, one stitch at a time. Welcome to the magical world of crochet; let the adventure unfold!
Chapter 2: How to Make a Slip Knot
Tying a slip knot is the first step in starting many crochet projects. Here's a step-by-step guide on how to tie a slip knot:

**1. Create a Loop: **
Hold the tail end of the yarn and form a loop with the tail on the top and the working yarn (the yarn attached to the ball or skein) at the bottom.

**2. Place the Loop on the Working Yarn: **
Take the loop and place it on top of the working yarn as shown.


**3. Grab the Working Yarn through the loop: **
With your fingers inside the loop, grab the working yarn (the one connected to the ball of yarn) and pull it back through the loop.


**4. Tighten the Knot: **
Hold onto the tail end of the yarn and the working yarn, and gently pull to tighten the knot. Adjust the size of the loop around your fingers or hook as needed.

**5. Adjust as Necessary: **
Make sure the knot is snug but not too tight. You should be able to easily slide the knot along the yarn to adjust its size if needed.

Congratulations! You've successfully tied a slip knot. This loop forms the base for your crochet (or knitting) project, allowing you to start working stitches. Practice tying slip knots until you feel comfortable with the process, as it's an essential skill in both crochet and knitting.
Chapter 3: How to make chains
Creating chains (abbreviated as ch) in crochet is the foundational step for almost all crochet projects. Here's a step-by-step guide on how to make chains in crochet:
**1. Start with a Slip Knot: **
Begin by making a slip knot. If you need instructions on how to tie a slip knot, please refer to the previous section.
**2. Hold the Yarn: **
Hold the slip knot between your thumb and middle finger of your left hand. Your index finger can help guide the yarn tension.
**3. Insert Hook: **
Insert your crochet hook into the slip knot. Hold the slip knot and the hook together with your left hand.

**4. Yarn Over and Pull Through: **
Yarn over (bring the yarn from the back of the hook to the front) by wrapping the yarn around the hook from back to front. Then, with the yarn over the hook, pull it through the slip knot. You now have one chain stitch on your hook.


**5. Repeat: **
Repeat steps 3 and 4 to make additional chains. Insert your hook into the last chain you made, yarn over, and pull through to create the next chain. Continue until you have the desired number of chains for your project.

**6. Practice Consistency: **
Try to keep your chains consistent in size. It's common for beginners to accidentally make the chains too tight, resulting in difficulty inserting the hook later. Practice can help you achieve a more even tension.

Remember, chains are used as the foundation for various crochet stitches and patterns. They are also used to create spaces and turning points in your work. As you practice, you'll find that creating even, consistent chains is essential for the overall appearance and structure of your crochet projects.
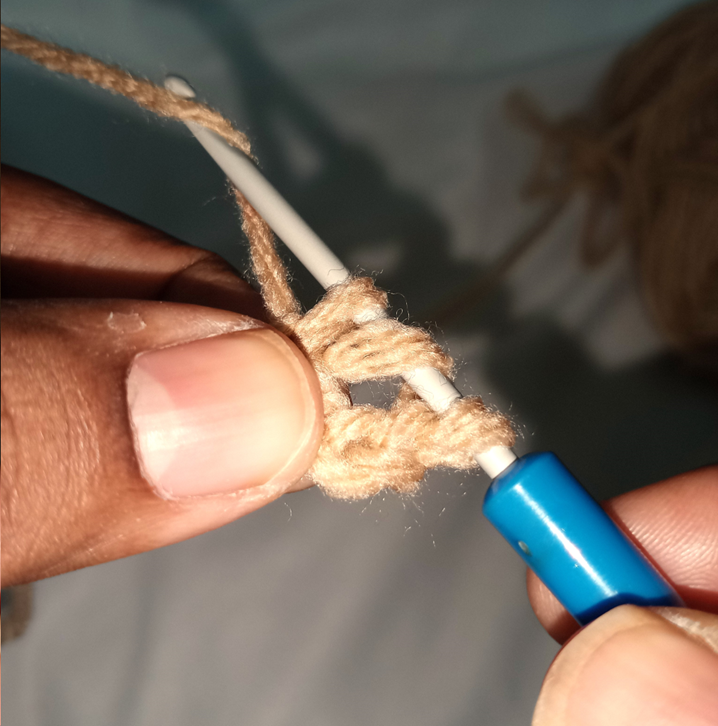
Chapter 4: How to Double Crochet
Here's a step-by-step guide on how to do a double crochet (dc) which is used for granny square and many other projects:
**1. Start with a Foundation Chain: **
Begin by creating a foundation chain. The number of chains in your foundation chain will depend on your pattern instructions. To practice, create a foundation chain of at least 15 chains.

**2. Yarn Over: **
Yarn over (abbreviated as YO) by wrapping the yarn from back to front over the crochet hook.

**3. Insert the Hook: **
Insert your hook into the fourth chain from the hook (or as specified in your pattern). The yarn over and the first three chains in the foundation chain count as the first double crochet stitch.


**4. Yarn Over and Pull Up a Loop: **
Yarn over again and pull up a loop through the chain. You should have three loops on your hook.


**5. Yarn Over and Pull Through Two Loops: **
Yarn over once more and pull through the first two loops on your hook. You should now have two loops left on your hook.


**6. Yarn Over and Pull Through Remaining Two Loops: **
Finally, yarn over again and pull through the remaining two loops on your hook. You have completed one double crochet stitch!


**7. Continue: **
To make the next double crochet, yarn over, insert your hook into the next chain, yarn over and pull up a loop, yarn over and pull through two loops, then yarn over and pull through the remaining two loops.

**8. Repeat: **
Continue making double crochet stitches in each chain across the row. When you reach the end of the row, chain (usually three chains) to turn your work and start the next row. The turning chain typically counts as the first stitch of the new row.
Remember, the turning chain and where you insert your hook are crucial in maintaining the proper height and structure of your double crochet stitches. Practice this stitch, and soon you'll be able to create a wide variety of crochet projects!
Chapter 5: How to Create a Magic Ring
Creating a magic ring, also known as a magic circle or magic loop, is a technique used in crochet to start projects worked in the round such as amigurumi, granny squares, and hats. It provides a tightly closed center that prevents a hole from forming in the middle of your work. Though a magic ring is used frequently in crochet, it might look slightly complicated for beginners. So, I am using bigger pictures for this section to make it absolutely clear. Here's how to make a magic ring in crochet:
**Step 1: Wrap the Yarn**
Wrap the yarn as shown in the picture.

**Step 2: Form an ‘X’**
Cross the yarn over the tail end to create an "X" as shown.

**Step 3: Turn Over**
The other side will look like this.

**Step 4: Insert the Hook**
Insert your crochet hook under the first strand of yarn and grab the second strand with the hook. Pull it under the first strand, creating a loop on your hook.


**Step 5: Twist**
Twist the hook(yarn) as shown in the picture.

**Step 6: Chain Stitch**
Chain one to secure the loop by grabbing the yarn as shown and bringing it through the loop. Now the magic ring is formed.


**Step 5: Work Stitches**
Work the required number of stitches (such as single crochet, double crochet, etc.) into the ring. For example, if your pattern calls for six single/ double crochet stitches, make the stitches into the ring stitches. Repeat this process until you have the desired number of stitches.


**Step 6: Tighten the Ring**
Hold the base of the stitches with your non-hook hand and gently pull the tail end of the yarn to tighten the ring. This will close the hole in the center of your work.

Slip stitch with the first stitch as shown.


**Step 7: Continue Working in the Round**
Once the magic ring is tightened, continue working the next round of stitches into the stitches of the previous round.

And there you have it, a magic ring in crochet! Practice this technique a few times, and you'll get the hang of it. It's a great way to start projects that require a closed center, giving your work a neat and professional look.
Chapter 6: Basic granny square pattern
**Materials Needed: **
- Worsted weight yarn in various colors
- Appropriate crochet hook for the yarn
- Yarn needle for weaving in ends

**Pattern: **
1. **Chain 3 and join with a slip stitch to form a ring. **


2. **Round 1: **
- Chain 3 (counts as your first double crochet).

- Make 2 double crochets into the ring.

- Chain 2.

- *Make 3 double crochets into the ring, chain2.* Repeat *-* two more times.

- Join with a single crochet to the top of the initial chain 3.


3. **Round 2: **
- Chain 3 (counts as your first double crochet).

- Make 2 more double crochets into the same chain 2 space.

- *In the next chain-2 space, make 3 double crochets, chain 2, 3 double crochets* (another corner).

- Repeat *-* for the remaining two chain-2 spaces.

- When you are back to chain-2 space where you started this round, make 3 double crochets and then chain 1. Join with a single crochet to the top of the initial chain 3.


4. **Round 3 and Beyond: **
- Continue in the same manner, increasing each round by making 3 double crochets, chain 2, 3 double crochets in each corner, and 3 double crochets in each side stitch.

- Repeat until your granny square is the desired size. You can change colors after each round or as often as you like to create a colorful pattern.
5. **Finishing: **
- Fasten off and weave in any loose ends.


This basic granny square pattern is just the beginning. You can create more intricate designs by changing colors, textures, and stitch patterns. Granny squares are a great way to unleash your creativity and make various projects, such as blankets, scarves, and more.
Happy Crocheting!!!
Comments